Manage recipients
Adding payment recipients in advance helps improve efficiency for your company during the payment process. This feature allows you to quickly add and save trusted recipients, ensuring you accurately send funds to the right individuals or businesses in the future. Explore below how to set up and manage your recipients effectively for a smoother banking experience.
First navigate to the Pay and Transfer tab, and click on the Manage Recipients tile.

Next, click on the New Recipient button, in order to be brought to the Add Recipient screen.

The information you will need to provide for an ACH vs. a Wire recipient will differ, since these payment types differ greatly.
You will first have to enter information in the top two fields:
| Description |
|---|---|
Display Name | The name of the account that will be stored in your online banking portal for future use. |
Email Address | Add your email address and click the box if you wan to send email notification for template payments |
Of these two fields, only Display Name is mandatory since this will be how the recipient name is stored in the digital banking platform, for future payments.

When you proceed to select ACH Only as the Payment Type, the following fields will display which are all required:
Field | Description |
|---|---|
Account Type | Select one. Checking, Savings, and Loan. |
Account | This is the account number of the recipient. |
ACH Routing Number | This is the routing number of the recipient's bank. |
Click on the blue check mark when you are done filling out this section.
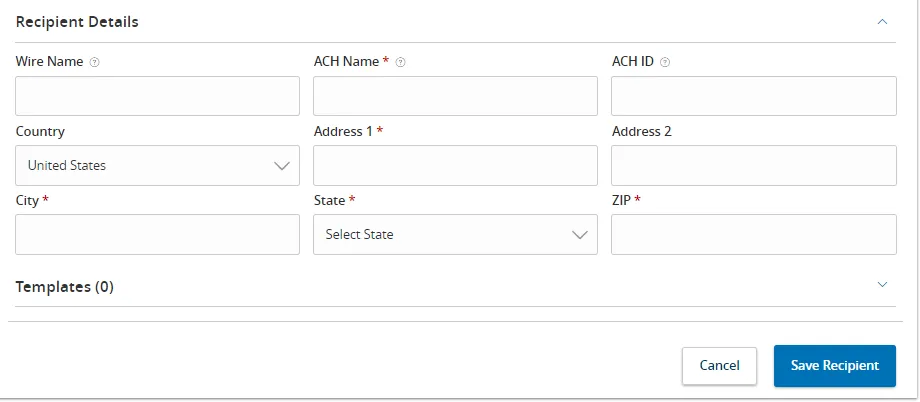
Next, you'll need to fill out the Recipient Details section. The following fields are relevant in this section:
Field | Details |
|---|---|
ACH Name | Required field where you enter the recipients name (maximum of 22 characters) |
ACH ID | Optional field that will be autopopulated during payment submission, so leave this empty (maximum of 15 characters) |
Address 1-2, City State and ZIP | Recipients full address including City, State and ZIP code |

Lastly, click on the Save Recipient button to ensure that the recipient is stored in the digital banking platform.
Once you've navigated to the Add Recipient screen, added a Display Name, and selected Wire Only as the Payment Type, the following fields will display:

These fields are required in this section:
Field | Description |
|---|---|
Account | This is the account number of the recipient. |
Recipient FI Name | The name of the bank where the recipient's account is. |
FI ABA Number | American Bankers Association Routing Number for the recipient's bank. |
Address 1-2, City State and Postal Code | Recipient bank's full address including City, State and Postal code |
Click on the blue check mark when you are done filling out this section.
Next, you'll need to fill out the Recipient Details section. The following fields are relevant in this section:
Field | Details |
|---|---|
Wire Name | Required field where you enter the recipients name, as recognized by Recipient's FI (maximum of 22 characters) |
Address 1-2, City State and ZIP | Recipients full address including City, State and ZIP code |

Lastly, click on the Save Recipient button to ensure that the recipient is stored in the digital banking platform.


